 Sotto Note
1Getting started
You write a thought and save it. A note needs nothing more.

How to
- Tap the plus button.
- Type your thought. A note needs no title and no folder.
- Tap “Save”.
- The newest note is at the top of the list.
You type “Gift ideas for Mum: scarf, book, concert tickets” and save. The note sits right at the top of the list, without a title.
Good to know
- In the same entry you can paste a link, add photos or record your voice.
- Paste images, PDFs and audio files from the clipboard with ⌘V or “Paste” in the context menu to attach them. On iPhone and iPad this works in the note field and in the “Edit Entry” dialog. On the Mac it works in the input card, for images only, such as a screenshot, an image from Preview or an image file from the Finder. Text is still pasted as usual.
- On the Mac, you type in the field at the top of the window. ⌘↩ saves, Return starts a new line, and ⌥⌘↩ adds the text to the selected thread.
- Later you can add to a note in the field at the bottom (“Add to thread”). Then it becomes a thread, see chapter 4.
- Sotto Note is available in English and German, more languages are planned. It follows your device language. In Settings > Language you can also pick “English” or “Deutsch”. The new language takes effect after you restart the app, on the Mac with “Relaunch Now”.
- In Settings > Appearance you choose “System”, “Light” or “Dark”. On the Mac both are in the “General” tab. “Pure Black in Dark Mode” is available on iPhone and iPad.
2Voice notes
You speak a thought instead of typing it. Sotto Note keeps the audio and writes out the text.
How to
- Tap the microphone in the note field and speak.
- Tap “Finish Recording”.
- Sotto Note writes out what you said, right on your device. The audio never leaves the device.
- You can play the recording from the note at any time.
Pauses and spoken format commands
- Paragraphs from pauses: A pause of about a second and a half starts a new paragraph.
- Spoken formatting commands: Say “heading shopping” or “checklist milk next item eggs”. “New item”, “new paragraph” and “new line” work too. The command words disappear from the text. This works in English and German, with no AI.
- You can see all commands in Settings under “Voice Note Formatting”, at “All commands”. Each row shows what the command does, an example sentence to say and the result. There you can also turn “Paragraphs from pauses” and “Spoken formatting commands” off separately.
- Suggestion from Apple Intelligence: If a recording sounds like a list, Apple Intelligence suggests paragraphs, headings and lists (“Add structure?”). You see a preview and can undo it. Nothing changes until you agree. Only line breaks and list markers are added. Your words stay the same.
- Spelling: Transcripts are checked and corrected automatically. Possible mistakes are marked, with suggestions to swap in.
You say: “Checklist milk next item eggs.” You get a checklist with Milk and Eggs.
Recording in the background
- Put the shortcut “Voice Note in Background” on the Action Button or in the Shortcuts app. With Siri, you say “Record a voice note in Sotto Note”.
- Press the Action Button. The recording starts in the background.
- A Live Activity on the Lock Screen and in the Dynamic Island shows the recording. There you end it with “Stop Recording”. You can also press the Action Button again.
- If the app crashes, nothing is lost: the recording becomes a note on the next launch.
Download the Parakeet model
Without another model, Sotto Note uses Apple’s speech recognition in your device language. Parakeet is an optional model. It detects the language automatically, in 25 European languages (including English, German, French, Spanish and Italian), even if you switch languages between recordings. It works offline.
- Open Settings and go to “Transcription”.
- At “Speech Engine”, choose “Parakeet”.
- Tap “Download Model (about 600 MB)”. Until the model is downloaded, the app keeps using Apple’s speech recognition.
- To stop, tap “Cancel Download”. You can download the model again later.
3Apple Watch
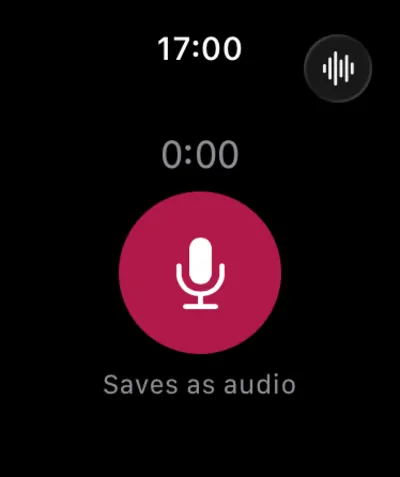
You record a thought on your wrist. It arrives on your iPhone and becomes a note there.
How to
- Open Sotto Note on your Apple Watch.
- Tap the button at the top right to choose whether the recording is saved “As Audio” or “As Text”. The line below shows what applies right now.
- Tap the large record button and speak. “Pause” holds the recording, the cross cancels it.
- Tap the button to finish. “Sent to iPhone” confirms the transfer. If the iPhone cannot be reached, it says “Waiting for iPhone…”. The recording then waits until the iPhone is back.
What happens on the iPhone
- The recording is transcribed on the iPhone. “As Audio” also keeps the recording. “As Text” saves only the text.
- Commands in the text, such as “Remind me tomorrow at 9”, are carried out.
- If a collection has a rule and Apple Intelligence is available, Sotto Note files the note there.
- If the transcript reads like a list, Apple Intelligence suggests paragraphs and lists.
Action Button on Apple Watch Ultra
- On the Watch, open Settings and go to “Action Button”.
- Choose “Shortcut” and then “Record on Apple Watch”.
- Press the Action Button. Sotto Note opens and starts recording.
Complication on the watch face
- Touch and hold the watch face, then tap “Edit”.
- Swipe to the complications, tap a circular slot or a corner and choose “Voice Note” under Sotto Note.
- Tap the complication. Sotto Note opens and starts recording.
- On full-color watch faces the complication shows the app icon. On tinted faces it takes on the color of the watch face.
- You can also add the same complication to the Smart Stack.
4Threads and links
You add to a note later instead of creating a new one. A single thought becomes a timeline.

Add something
- Open a note.
- Write in the field at the bottom (“Add to thread”) and tap “Send”.
- The entry appears below the earlier ones, like a reply in a chat. In the list it stays one note, with the number of replies.
A thread can contain text, photos, links, PDFs and voice notes. You can share or copy single entries and whole threads.
On the Mac, you edit an entry in a thread with “Edit” in the context menu or by double-clicking the entry. In the “Add to thread” field, Return and ⇧Return insert a line break, and ⌘↩ sends.
Chain notes and pull them out
- In the notes list, open the context menu of a note. To pick several notes, choose them first with “Select”.
- Tap “Add to Thread…” and choose the thread. “Search threads” helps you find it quickly.
- To pull an entry out again, open the entry’s menu in the thread and tap “Remove from Thread”.
Embed a thread in a thread
- Open the thread that should receive the other one.
- In the “Add Attachment” menu (the plus button) or the “More” menu, tap “Embed Thread”.
- Choose the thread. It appears as a small card with the number of replies and opens when you tap it.
- To remove it, choose “Remove Embedding” in the card’s menu.
You collect everything about a trip in one thread: tickets, a hotel link, packing ideas. The packing list can be a thread of its own that you embed.
5Photos, links, PDFs
You attach things to a note so they stay together.
How to
- In the note or thread, tap “Add Attachment” (the plus button).
- Choose “Photo Library”, “Take Photo”, “Choose File” or “Record Voice Note”.
- The attachments appear as previews. The cross removes an attachment again before you save.
- Tap “Save”.
What you get
- Photos: Take one or pick one from your library.
- Links: Paste a link. Sotto Note fetches the title, preview image and source. The request goes straight from your device. If you wrote no text of your own, the page’s description (teaser) becomes the note text. With Apple Intelligence, the link note is filed into a collection like other notes and gets tags, for example for the kind of source (newspaper, blog …). For links from other apps this happens the next time you open the app, if the collection rules setting is on. Without Apple Intelligence, you get the teaser only.
- PDFs: They show a preview of the first page.
- Audio: Voice recordings with a waveform and the duration.
- Attachments stay with the note and are included when you export it.
- Through the Share menu of other apps you can also save links, text, images and PDFs, see chapter 16.
6Text in images
Sotto Note reads text in your photos. That way you find the photo of a sign, receipt or menu again through search.

What is recognized
- Text and content in photos are recognized on your device. Nothing leaves your iPhone or Mac. You do not need Apple Intelligence for this.
- The recognition looks for German and English text.
- The recognized text does not appear in the note. It makes the image searchable and helps Apple Intelligence file the note into a collection and tags.
- Images from the Share menu are analyzed afterwards when needed.
Put the text into the note
- Add a photo.
- On the photo, tap the “Use text from image” switch. It is highlighted when it is on.
- Tap “Save”. The recognized text is now in the note. If the note was still empty, the text replaces it. Otherwise it goes below the existing text.
Later: the image’s context menu
- Copy Text: copies the recognized text.
- Add Text to Note: appends the text to the note.
- Recognize Text Again: runs the recognition once more, for example when it found nothing.
Turn it off
In Settings there is a section called “Images” with the switch “Recognize text in images”. It is on by default. “Recognize Text Again” also works while the switch is off.
You photograph a street sign. Later you search for the street name and find the note with the photo.
7Maps
You attach a place to a note, as a map image with a link to Apple Maps.
How to
- Tap “Add Attachment” (the plus button) and choose “Map”.
- Choose “Current Location”, “Choose Place…” or “Route…”.
- With “Choose Place”, you search for a place or tap the map to set the pin.
- With “Route”, you choose a start, a destination and how you travel: “Car”, “Walking”, “Cycling” or “Public Transit”. For public transit, the map shows only the start and the destination.
- Tap “Add” and then “Save”.
Working with the map
- Tap the map and Apple Maps opens. The map’s context menu also has “Open in Maps”, “Copy Link” and “Share”.
- If location access is off, you search for a place or start instead. Or you allow access in Settings.
You attach “Central Station” as the start and “Hotel Alfama” as the destination, travelling on foot. The note shows the route as a map.
8Trip plan and trip log
One way to use the app: you plan a trip and keep a log on the way, all in one thread.

How to
- Plan: Write a note for the trip, for example “Lisbon in May”. This is the thread for everything else (chapter 4). Create the packing list as a note of its own and embed it with “Embed Thread”.
- Places and routes: Attach hotel, restaurants and routes as a map (chapter 7).
- Tickets: Attach them as a photo or PDF (chapter 5). For photos, Sotto Note recognizes the text, such as the booking number (chapter 6). PDFs stay on the thread as a file with a preview.
- On the way: Speak thoughts into your Apple Watch or iPhone (chapters 2 and 3). A recording from the Watch lands on the iPhone as a note of its own. With “Add to Thread…” you move it into the trip thread.
- Later: Search for a word from the notes or from the photo (chapter 13). With the export you save the thread as a Markdown file (chapter 18).
The thread “Lisbon in May” holds the route from the airport to the hotel, the photo of the boarding pass, the embedded packing list and a voice note from the Watch: “Try the restaurant by the river, tomorrow at 8.” A year later you search for “river” and find everything in one place.
9Collections and tags
Two ways to keep order: a collection is the main place of a note, tags are finer keywords.

Create and use a collection
- Choose the “Collections” tab and create one with “New Collection”, for example “Recipes” or “Work”.
- Give it a name and a color. It appears as a colored circle with the first letter. Under “Symbol” you can pick a symbol instead of the letter, for example an airplane for travel.
- Move a note with “Move to Collection…” in the context menu, or with the collection button in the note. On the Mac and iPad you can drag notes onto a collection in the sidebar.
- With “Pin to Top”, a collection stays at the very top.
- A note lives in exactly one collection, or in none.
- In an open collection (iPhone, iPad, Mac), a row above the list shows the collection’s tags, most frequent first. Tap a tag to filter. With several tags selected, only notes that have all of them remain. Tap again to clear the selection. The selection is not saved.
- When you delete a collection, the app asks “Keep Notes” or “Delete Notes Too”. Notes deleted with it go to the Trash and no longer belong to a collection.
- In a collection’s settings you can add a short description. Apple Intelligence uses it to decide which new notes belong there.
- You can change color and symbol later with “Edit” (context menu or swipe), on the Mac with a right-click in the sidebar and “Color and Symbol…”.
- You can protect a collection with “Lock Collection” (chapter 15).
Tags
- In the note, tap the “More” menu (three dots), then “Tags”.
- Choose a tag, or create a new one with “Create New Tag”.
- A note can have up to five tags. On the Mac and iPad, a tag in the sidebar shows all notes that have it.
A note in “Recipes” has the tags “Soup” and “Quick”. A note in “Work” has your app’s name and “Fix”.
Use a collection for the main place and tags for details you may want to find later. If a name is already a collection, Sotto Note uses the collection instead of creating a tag with the same name.
10AI features
Apple Intelligence helps with sorting and correcting. It runs on your device and decides nothing without you.

These features never go through Sotto Note servers or other AI providers. You need a device with Apple Intelligence, turned on in the system settings. Without it, everything works by hand. The AI works in the language of the note, not in the language of the app.
What happens automatically
- Filing: A new note moves into the best matching collection. A hint offers “Undo”. While you type, you already see the fitting collection.
- Existing tags: Fitting tags you already use are added while you type and after saving.
- Collection rules: If a collection has a rule, matching notes are added to it. You can undo each assignment.
- The AI never creates collections by itself and never overrides your choice. If you picked a collection by hand, it stays.
What is only a suggestion
- New tags: They appear as an outlined chip and count only after you tap them.
- Reminders: If a note mentions a time, Sotto Note offers a reminder. Nothing is set until you confirm.
- Add structure: for voice notes that read like a list.
- Correct Text: fixes spelling and punctuation. You see Before and After and decide. The original is kept.
- Obsidian export: suggests a title, tags and a matching note to append to. You can change everything.
Every suggestion is double-checked first. If in doubt, nothing is applied.
Undo
- After filing into a collection, tap “Undo” in the hint.
- To remove a tag the AI added, simply remove it from the note.
- A correction can be undone afterwards.
Turn it off
Open Settings and look for the “Intelligence” section. On the Mac it is a tab of its own. There you switch off filing, tag suggestions and rule-based sorting. Automatic reminder detection has its own switch in the same section.
The AI learns from your corrections
- When you change a suggested collection or tag, Sotto Note remembers it. Next time it shows the AI similar cases as examples. This is not training.
- If iCloud Sync is on, learned assignments sync to your other devices through your private iCloud account. Without sync they stay on the device. They never go to the developer.
- Under “Learned Assignments” you can review and delete them. Locked notes are left out.
11Commands and reminders
You write what you want. Sotto Note does it when you save.
Commands in notes
- Write a phrase like “Remind me tomorrow at 9” in the note.
- Or write a line of its own like “Tags: Food, Car”.
- Tap “Save”. The reminder is set or the tags are on the note. The tags line disappears from the text.
- Commands work in English and German and need no AI.
- With Apple Intelligence, freely worded requests are understood as well.
- You can switch this off in Settings at “Apply commands in notes”.
Set reminders by hand
- In the note, tap the “More” menu (three dots), then “Add Reminder”, and pick a date and time. The context menu has the same entry.
- At the set time you get a notification.
- In the notification you can mark the reminder as done or snooze it.
- You find all notes with a reminder under “Reminders”.
If notifications are off, allow them in Settings under “Notifications”. The switch “Detect reminders automatically” is in the “Intelligence” section. It needs Apple Intelligence. By hand always works.
12Review
You see older notes again as a stack of cards and decide with a swipe.

How to
- Choose the “Review” tab and one of the three stacks.
- Swipe a card right, or tap “Active”, to keep the note active.
- Swipe left, or tap “Library”, to move it to the Library.
- Under the card you can star the note, add a tag or a reminder, or move it to the Trash.
The three stacks
- New: notes you have not reviewed yet.
- Revisit: active notes you have not touched for a while.
- Rediscover Library: saved notes in random order.
13Search
You find any word in any note.

How to
- On iPhone, open the “Search” tab. On the Mac and iPad, use the search field at the top of the window (“Search everything” on the Mac).
- Type a word.
- Tap a match. Matches are highlighted in the results.
- Search looks through notes, threads, attachments and transcripts.
- The recognized text in photos is found too (chapter 6).
- Locked notes reveal nothing in search, and neither do their tags.
- You can search with Siri and Shortcuts as well: “Search notes in Sotto Note”.
14Formatting
You format text right in the editor. Notes are saved as Markdown, so they stay plain text.
How to
- On iPhone and iPad, a bar above the keyboard formats your text. You can customize the bar.
- On the Mac, the system spell checker works in the text field.
- On the Mac, use the “Format” menu or the context menu. The menu also shows the keyboard shortcuts.
- Or type the marks yourself. Text between two asterisks, like **bold**, is formatted right away.
- You can use bold, italic and strikethrough, code, headings and quotes, bullet lists, numbered lists and checklists.
- Return continues a list. Return on an empty list item ends it.
Type “- ” and a space to start a bullet list. Type “- [ ] ” and a space to start a checklist.
15Star, Library, Trash, locking
You keep the list tidy and protect private notes.
Star, Library and Trash
- Swipe a note in the list or open its context menu.
- “Star” marks an important note. Starred notes have their own filter.
- The “Shared” filter shows shared notes: ones you share, ones others share with you and notes in a shared collection. It appears only when at least one note is shared. On the Mac and iPad it is in the sidebar, on iPhone in the filter menu.
- “Move to Library” stores a note you want to keep but not see every day. It leaves the Active list and comes back in Review. “Move to Active” brings it back.
- “Move to Trash” puts a note in the Trash. Until you empty it, you can restore the note. On the Mac, ⌘⌫ moves selected notes to the Trash.
- The Trash tidies itself. Under “Empty Trash Automatically” you set the period, from 1 day to 1 year, or choose “Never”. The default is 1 month.
Locking
- Open a note’s menu and tap “Lock”. You lock a whole collection with “Lock Collection” while editing it, or with “Lock” in the collection’s context menu, including the sidebar on Mac and iPad.
- A locked collection only opens after Face ID, Touch ID or your device passcode. After that you see all notes in it without asking again. As soon as you leave the collection or the app goes to the background, it is closed again.
- To open it, you need Face ID, Touch ID or your device passcode. The same applies when you move, edit or share locked content.
- “Unlock” removes the lock again.
Individually locked notes show only a placeholder in lists, search, widgets and notifications. Notes in a closed locked collection don’t appear outside the collection at all, not even in search, tags or widgets.
16Capture from anywhere
You hold on to a thought without opening the app.
Options
- Widgets: “New Note”, “Voice Note”, “Last Note” and “Recent Notes”, for the Home Screen and Lock Screen.
- Control: a button for Control Center or the Lock Screen that opens a new note.
- Share menu: In any app, tap “Share” and choose Sotto Note. You save a link, text, images or PDFs. There you can add a note, choose a collection and add tags. On the Mac, close the window with “Done” or with Esc.
- Siri and Shortcuts: Siri also knows the app as “Sotto”. You create notes, record voice notes and search your notes.
- Action Button: starts the voice note in the background (chapter 2).
- Apple Watch: voice note on your wrist (chapter 3).
Mac
- Press ⌘⇧N in any app. A small capture window opens.
- Type and save. You change the shortcut in Settings at “Quick capture shortcut”.
- With “Show in Menu Bar”, you put an icon in the menu bar. It gives quick access. The menu shows “Open Sotto Note”, “New Note”, “Search…”, the last five notes, then “Settings…” and “Quit Sotto Note”. Notes without text appear there by attachment type, for example “Image” or “Voice note”.
- With “Hide Dock Icon When Window Is Closed”, the Dock icon disappears as soon as you close the window with the red button. Sotto Note keeps running in the menu bar and with the shortcut.
17Sharing with others
Share a collection or a single note with other people, for example a shopping list where everyone ticks things off.
Share and invite
- Open the context menu of a collection or a note and tap “Share with Others…”.
- Apple’s sharing window opens. Invite people by Messages, Mail or link.
- Set the permission for each person: “View only” or edit.
- The person opens the invitation. The collection or note appears in their app with a person symbol and the line “From …”.
- Invited people need an Apple ID with iCloud and Sotto Note. iCloud Sync must be turned on for both of you.
- Something that is already shared can’t be shared again.
Working together
- To-do lists: If two people tick off different items at the same time, both ticks are kept. The same goes for new and deleted lines. If two people change the same line, the newer version wins. The entry shows a “Changed at the same time” notice; tap “Show Other Version” to see the version that wasn’t applied, then choose “Use This Version” to keep it or “Keep Current” to dismiss it.
- Tags in a shared collection apply to everyone.
- Star, reminders and Review stay personal. They are not shared.
- View only: With this permission you can read the content but not change it. The app shows “View only”.
- Apple Intelligence does not file shared notes into collections.
Locked content
- Locked notes and collections can’t be shared. A shared collection can’t be locked.
- If you move a note into a shared collection, the app asks “Move to Shared Collection?”. Everyone in the collection will then see the note. A locked note can’t be moved.
Seeing changes by others
- If someone else changed something, the note card shows a dot (“Unread change by …”). The collection shows the number of unread changes.
- In the note you see “Changed by … · 5 min ago”. When you open the note, the marker is gone.
- Tap “Activity” in the toolbar of a shared collection or note. It lists changes by others for up to 30 days.
- Notifications: In Activity, the “Notifications” setting lets you choose “All Changes”, “New Items Only” or “Off”. It applies to this device only. The markers in the app always show new changes.
Manage and end sharing
- Open the context menu and tap “Manage Sharing…”. In Apple’s window you see the participants, change permissions, remove people or stop sharing.
- As a participant, tap “Leave Share” in the context menu and confirm.
- If sharing ends or a participant is removed, the owner keeps the content as normal, private notes.
- The participant loses it. It is removed from their devices.
18Sync, export, Obsidian
Your notes are available on all your devices and in other apps.
iCloud Sync
- In Settings, turn on “iCloud Sync”.
- Your notes appear on all devices, with photos, PDFs and recordings.
They live in your private iCloud account. Nobody else can read them, except people you share something with (chapter 17).
Import and export
- In Settings, open “Import & Export”.
- Tap “Export All Notes…” and choose a folder. You get Markdown files, one per thread.
- With “Import Markdown…” you bring a folder or single Markdown files into the app, including notes from Obsidian.
Obsidian
- In Settings, at “Obsidian”, tap “Choose Vault Folder…” and pick your vault’s folder. You do this once.
- Open a note’s menu and tap “Export to Obsidian…”.
- Choose whether the note is written as a new file or appended to an existing note.
- Check the preview and change whatever you like. Then you export.
- Sotto Note writes the Markdown files straight into the folder. No plugin is needed.
- With Apple Intelligence, a title, tags and a matching target note are suggested, and the text can be corrected first (“Correct text before export”). Your note in Sotto Note stays unchanged. Without Apple Intelligence, you set these by hand.
19Your data and privacy
Your notes stay with you.
- No account is needed.
- Your notes are stored on your device, and in your own iCloud if you turn on sync.
- Sotto Note has no server for your content.
- Speech recognition and AI run on your device, using Apple’s models. The audio is not uploaded. There are no ads and no tracking.
- Text recognition in images runs on your device too.
- Pasted links are fetched by your device directly to load the preview.
All details are in the privacy policy. You also find the Privacy Policy and Terms of Use in Settings. The frequently asked questions on the home page answer more.